How to upload and manage files in the Files library
Upload, browse, search, open, and manage non-image files in a mapped BaseBuddy Files library.
Use this guide when you need to add or manage PDFs, documents, spreadsheets, data files, archives, or other non-image assets in a project's Files library.
Files is separate from Media. Upload images from Media instead. BaseBuddy rejects image files in Files so the file library stays focused on downloads and attachments.
Before you start
The project needs a mapped Files library. If Files is missing from the project sidebar, ask a project owner to check the file storage setup.
Your account also needs manage access to upload, move, or delete files. Users without manage access can still browse the file library, search, and open files, but they cannot change stored objects.
Files can be up to 25 MB each. Upload 10 files or fewer at a time. BaseBuddy prepares a signed upload URL, then the browser uploads bytes to Supabase Storage or the S3-compatible provider; your provider, browser upload path, and any BaseBuddy multipart API path need compatible limits.
Files accepts these document, data, and archive extensions: csv, doc, docx, gz, json, md, pdf, ppt, pptx, rtf, tar, txt, xls, xlsx, xml, and zip.
Upload files
- Open the project in BaseBuddy.
- Open Files.
- To upload into the root of the library, stay on Home.
- To upload into a folder, open that folder first.
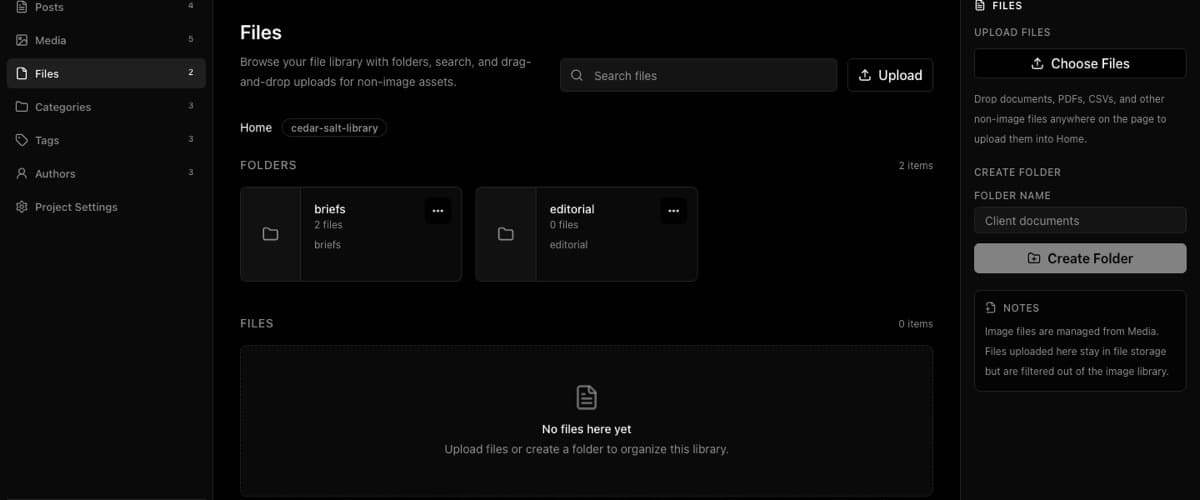
- Click Upload near the top of the library, or click Choose Files in the sidebar.
- Choose one or more supported files.
- Wait for the upload to finish.
You can also drag supported files onto the Files page. BaseBuddy uploads dropped files into the current folder.
If an upload fails, check the file type, file size, batch size, storage access, provider limits, and host request body limit. Image files are rejected here; use Media for images.
Browse and search
Use the breadcrumb at the top of the library to move through folders. Click Home to return to the root.
When you are at the root, the search field says Search files. Inside a folder, it says Search this folder. Search matches file names and object paths.
Search results show matching files, not folders. Clear the search field to browse folders again.
Open a file
- Find the file in Files.
- Click Open on the file row.
If you need the file menu instead, open the file actions menu and click Open file.
Private or signed file URLs are temporary. Do not treat a signed URL copied from BaseBuddy as a permanent public download link.
Create folders
- Open Files.
- Use Folder Name in the sidebar.
- Enter a simple folder name.
- Click Create Folder.
Folder names cannot contain slashes. BaseBuddy creates the folder in the current location.
Move or delete files
Use the file actions menu when you need to reorganize a file:
- Open Files.
- Find the file.
- Open the file actions menu.
- Click Move file to choose another folder, or Delete file to remove it from the file library.
Be careful with move and delete actions. Moving a file changes its object path, and deleting removes the stored object. Existing post links, site templates, or external references that point to the old object path can break.
For safer cleanup steps, use How to move or delete files safely.
What Files does not change
Managing the Files library does not publish, unpublish, archive, or save a post. It also does not rewrite post bodies that already link to a file.
If you want to insert a file link into a post body, use How to insert files or downloads into a post.
Storage credentials stay in environment variables. BaseBuddy does not store upload credentials in project rows.
Related guides
- Media and files
- Caps and rate limits
- How to insert files or downloads into a post
- How to organize files with folders
- How to move or delete files safely
- How to insert images into a post